My fridge is always stocked with Natalie’s and I’m slowly convincing all my friends to keep their fridge stocked with it too! If you’ve been following my blog for awhile you know that I’m a self labeled orange juice snob (if there is such a think) and I just adore Natalie’s fresh squeezed juices. So I thought it was fitting that our kitchen had a citrus tea towel that was just as colorful as my favorite juices!
You don’t need fancy embroidery skills to create this adorable dish towel. Just a simple straight stitch is all you need to know to make these colorful towels!

Time: 1 hour + drying time
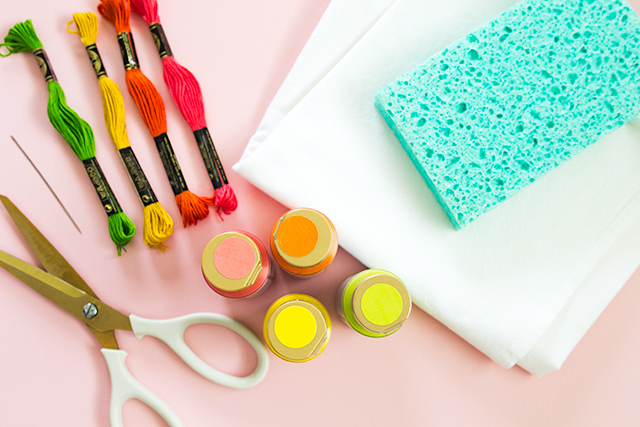
Supplies: cotton tea towels / fabric paint or craft paint + fabric medium / kitchen sponge / scissors / embroidery floss / needle
Step 1: Cut a large kitchen sponge in half and then cut each half into a circle. Cut the circles in half to create semi-circles.
Step 2: Pour paint onto a palette or paper tray and dip one side of the sponge into the paint. Press down on the towel to create a stamped shape. If it didn’t fill in as much as you wanted, add more paint and re-stamp it. Repeat this, alternating colors along the bottom edge of the towel.
Allow the paint to dry completely. If you’re as impatient as I am, grab your hair dryer and dry the paint in a couple minutes.
Step 3: Use embroidery floss that’s slightly darker than the paint colors. Cut about a 30″ piece of floss and thread your needle. Tie a knot at the end and use a straight stitch to create the “peel” along the round edge of the shape.
Step 4: Once you’ve completed the edge, bring the needle up through the bottom of the fabric in the center of the straight edge. Stitch diagonal lines from the center out towards the round edge to create the citrus segments. When you’re done, end on the back side of the fabric and tie a knot. Repeat this with the other shapes until you’re done!
Most fabric paints and craft paints mixed with fabric medium must be heat set before being washable. Follow the directions on the paint bottle to ensure your design won’t wash away in the washer!
Want to see what other delicious recipes and DIY’s I’ve made with Natalie’s fresh juices? Check them out here.
This post is sponsored by Natalie’s Juice. Thanks so much for supporting the brands that keep Sarah Hearts going!
Nail color: Marilyn Monroe gel in Flirty | Flatware: West Elm


Super cute Sarah! Love that this embroidery is do-able and won’t take all day!
Thanks so much girl!
These are so cute!! Love the colors and I can’t believe you used a regular old sponge!
Thanks Bre! It’s always fun being able to use up supplies you have on hand, like a kitchen sponge, in a new way!
These are so so cute! I am loving the mix of paint and embroidery. Genius!
Thanks so much, Cyd! xo
The embroidery is such a perfect touch to take it to the next level!
Thanks so much, Lindsay!
I love this tutorial! I’ve added it into my roundup found here http://www.babybugjournals.com/roundups
Thanks so much!
These are just the cutest!! Can’t wait to make them :)
Thanks so much, Jenny! Please share a photo with #sarahhearts if you do!